

Before Pre Start Machine Inspection: 10 Safety Checks Every Operator Must Perform
- Check 1: Walk Around Visual Inspection
- Check 2: Fluid Levels
- Check 3: Operator Manual and Labels
- Check 4: Seat and Seat Belt
- Check 5: Controls and Levers
- Check 6: Brakes and Parking Brake
- Check 7: Lights, Horn, and Alarm
- Check 8: Tires or Tracks
- Check 9: Hydraulic Hoses
- Check 10: Emergency Stop Devices
- What To Do After Inspection
Every machine can kill you. That is not an exaggeration. Hydraulic failures crush operators. Electrical shorts ignite fires. Worn brakes cause runaway equipment. Loose bolts drop loads. You work around these risks daily. A five minute inspection separates a normal shift from a fatal mistake.
This guide covers 10 safety checks for every operator. These checks apply to scissor lifts, forklifts, cranes, excavators, and any industrial machine. Complete these checks before you turn the key. Your life depends on consistent pre start machine inspection. If you are operating modern equipment, like those discussed in our guide on Typhon Scissor Lifts Operator-First Engineering, you will see how design integrates with these crucial safety protocols.
Each check reinforces why a pre start machine inspection saves lives. Do not skip steps. Do not rush. Your family expects you home tonight. Pre start machine inspection is not optional. It is your first line of defense. Operators who skip pre start machine inspection accept unnecessary risk. A proper pre start machine inspection takes less than five minutes. That time investment pays in safety dividends.
Let us begin.
Walk a full circle around your machine. Look for fluid leaks on the ground. Check for damaged hoses or wires. Examine tires or tracks for cuts and low pressure. Look for loose bolts or missing pins. Inspect the undercarriage for debris buildup.
A thorough pre start machine inspection starts here. Many failures begin as small leaks or loose parts. Your pre start machine inspection catches these issues before they become emergencies. Spend 30 seconds on this walk around. Do it every shift.
Open the hood or access panel. Check engine oil. Check hydraulic fluid. Check coolant. Check fuel level. Low fluids cause overheating and component failure. A dry hydraulic pump fails in seconds. That failure can drop a suspended load.
Your pre start machine inspection must include fluid verification. Keep a small rag in your pocket. Wipe dipsticks clean. Read levels twice. Document any low readings. A complete pre start machine inspection prevents unexpected shutdowns at height.
Find your machine operator manual. Keep it in the cab. Read the daily inspection section. Check all warning labels on the machine. Replace any faded or missing labels. Manufacturers place these labels at danger points.
A proper pre start machine inspection verifies label readability. You cannot follow warnings you cannot read. Include this step in every pre start machine inspection. Labels cost little. Your life costs everything.
Sit in the operator seat. Adjust it for full pedal and lever reach. Check the seat belt webbing for fraying. Test the buckle latch. A torn seat belt offers no protection. A failed buckle leaves you unrestrained during a tip over.
Your pre start machine inspection must confirm seat belt integrity. Pull the belt hard. Watch for loose mounting bolts. Replace damaged belts immediately. A disciplined pre start machine inspection includes this five second pull test.
Move every control through its full range. Steering wheel. Joysticks. Foot pedals. Switches. Levers should return to neutral. Pedals should not stick. Steering should feel smooth with no dead zones.
This part of pre start machine inspection reveals hidden mechanical problems. A sticky lever indicates linkage wear. A spongy pedal means air in hydraulic lines. Your pre start machine inspection catches these issues before you lift a load. Do not accept sticky or loose controls.
Apply the parking brake. Try to move the machine. The machine should hold firm. Release the parking brake. Test service brakes at low speed. Listen for grinding or squealing. Feel for pedal pulsation.
A brake failure on a slope kills. Your pre start machine inspection must include brake testing. Do this on flat ground first. Then test on a slight incline. Document any brake concerns. A responsible pre start machine inspection never ignores brake symptoms.
Turn on all lights. Headlights. Tail lights. Beacon lights. Flash your horn. Activate the backup alarm. Ask a coworker to confirm the alarm is audible. Check that mirrors are clean and adjusted.
Visibility saves lives. Your pre start machine inspection confirms every warning device works. A dead backup alarm puts ground workers at risk. A burned out beacon light reduces visibility in dusty conditions. Include lights and alarms in every pre start machine inspection.
Inspect each tire for cuts, bulges, and tread depth. Check air pressure with a gauge. Do not guess. For tracked machines, look for loose track bolts and cracked pads. Check track tension. A thrown track or blown tire at height causes tip overs.
Your pre start machine inspection must include a ground contact inspection. This takes two minutes. Carry a pressure gauge in your tool box. Note any slow leaks in your log. A thorough pre start machine inspection catches these issues before you move.
Run your hand along visible hydraulic hoses. Do not touch hot or moving parts. Feel for soft spots or bulges. Look for wet spots indicating leaks. Check fittings for tightness. A loose fitting sprays fluid at high pressure. That spray can inject through skin.
Hydraulic failures cause many equipment accidents. Your pre start machine inspection should prioritize hose condition. Replace any hose with cracks or blisters. A careful pre start machine inspection takes one minute on hoses. That minute prevents a high pressure injection injury.
Locate the emergency stop button. Press it. The machine should shut down completely. Reset the button. Test the tip over alarm if equipped. Test the load moment indicator. Test the tilt alarm.
Your final pre start machine inspection step is device testing. Do not assume emergency stops work. Test them daily. A functional emergency stop is your last resort. A failed emergency stop leaves you helpless. Complete your pre start machine inspection with this critical step.
Record your findings. Use a paper log or digital app. Note the date, machine ID, and inspector name. Mark any defects. Report serious issues to your supervisor immediately. Do not operate a machine with safety defects.
Your pre start machine inspection log protects you. It shows you performed your duty. It creates a maintenance record. Supervisors can track recurring problems. A documented pre start machine inspection is your legal protection after an incident.
Consequences Of Skipping It
- A hydraulic line bursts at 40 feet. The platform drops suddenly. You break your back.
- A tire blows out while turning. The machine tips. You are crushed.
- A brake fails on a ramp. The machine rolls. You are pinned.
- A seat belt snaps during a tip. You are thrown. You hit your head.
- A backup alarm fails. You reverse into a coworker. They go to the hospital.
Common Excuses (And Why They Fail)
- Too busy: A five minute inspection saves hours of downtime.
- Checked yesterday: Machines change overnight. Temperatures drop. Fluids leak.
- Nothing breaks: Something breaks eventually. Usually when least expected.
- Boss doesn’t make me: Your boss does not face your risks. You sit in the seat.
- Machine is new: New machines have factory defects. Shipping damages components.
Arrive five minutes early. Park your personal vehicle. Walk to your machine. Open the cab. Get your inspection log. Follow the 10 checks in order. Record your findings. Then start the engine.
Repeat this sequence every shift. After two weeks, pre start machine inspection becomes automatic. You will not need to remember. You will just do it. Train new operators on your process. Share your inspection logs with maintenance teams. A team culture of pre start machine inspection reduces accidents. Hold each other accountable.
Technology and Fleet Managers: Newer machines have electronic inspection apps. Use them to enforce pre start machine inspection. But remember, technology does not replace your eyes and hands. A camera does not feel a loose hose. Your physical pre start machine inspection remains essential.
OSHA requires daily inspections for many equipment types. Failure to document inspections leads to fines and liability after an accident. Your pre start machine inspection log proves compliance. It is non negotiable under federal law.
Ten checks. Five minutes. One life. Yours.
- Pre start machine inspection saves lives.
- Pre start machine inspection prevents injuries.
- Pre start machine inspection protects your career.
Perform pre start machine inspection every shift. Do not skip. Do not rush. Do not assume. Follow the 10 checks in order. Record your findings. Report defects. Only then should you start the machine. Now go inspect your machine.
🔗 Explore heavy equipment and safety-focused machinery:
Visit TyphonMachinery.comYour life depends on a proper pre start machine inspection. Equip your team with the most reliable machinery and enforce a strict safety culture today.
Upgrade Your Fleet with TYPHON →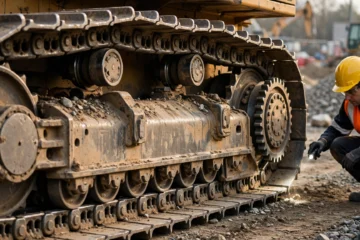


[…] I chose the second option. Here is exactly what happened and how I fixed my machine in 10 minutes. Before making this a habit, it helps to be thoroughly familiar with your equipment. You can brush up on safety and familiarization in our guide: Before Pre Start Machine Inspection: 10 Safety Checks Every Operator Must Perform. […]